
More complex level modelling
· Introduction
This tutorial details a simple methodology for building a closed environment level.
At the end of the operations exemplified in this tutorial, we have constructed the geometry of a level (stored as a .max file).
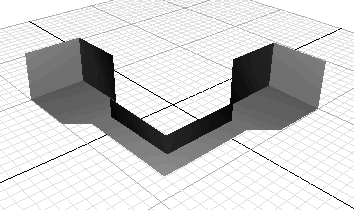
The basic building block is a box. The level is constructed by joining boxes together, dragging vertices to convert the boxes into truncated rectangular pyramids then deleting shared faces to create the final environment. An advantage of this construction method is that correct topology is maintained for the environment. This means that if a construction, such as that shown in last figure from this tutorial is required, then the face normals will have the correct direction (the direction of the surface normals must be consistent with the rule that the entire environment must exhibit a single inside space and a single outside space). This rule is more difficult to guarantee as more complex shapes are used by an editor.
· 3D Studio Max operations
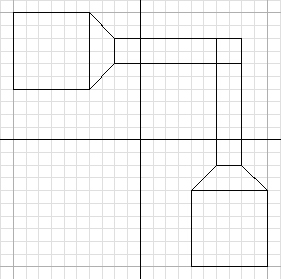
1) Draw 7 boxes as shown using the box creation tool
2) Use the edit mesh modifier to move the vertices of boxes 2 and 6 as shown so that they align with the vertices from boxes 1 and 7
3) Attach all boxes to each other using the attach multiple tool to create a single environment. All boxes now merge to form a single object
4) Use the edit modifier again to remove the 6 pairs of shared faces (note there are 2 triangles per face)
5) Still using the edit mesh modifier, select all vertices and weld them with the weld vertices tool deleting duplicated vertices (vertices that share the same position in space).

6) Still using the edit mesh modifier select all face and invert their normals so that they point inwards.
7) Apply material and texture mapping co-ordinates using the material editor and UVW mapping tool.
8) Create some light objects (you can use simple small box objects for example). Place the lights in appropriate positions and apply a standard material with self illumination value larger then 0.
9) Associate real dimensions to your model by setting the desired values in the Preferences menu on the general tab system unit scale. For example, for a wall of 50 units length, you might set 0.2 unit = 1 meter, making the virtual wall 10 meters long.